After we've added some new projects to an Aspire Solution last week, we will have a look how we can modernize a blazor application and replace the standard Bootstrap with Tailwind CSS.
Just a day ago Tailwind was released in version 4.0 and the installation changed a little bit. This guide will walk you through the installation and configuration of Tailwind CSS and show you how to enhance your development workflow with build Targets and npm task runners. By the end, you'll have a sleek setup to build modern Web Apps.
Prerequisites
Before diving into the integration of TailwindCSS into your ASP.NET Core application, make sure you have the following tools and resources set up. These are essential to ensure a smooth experience as you follow along:
- Node.js
- pnpm
If you are unsure if those tools are installed, you can simply type
node --versionandpnpm --versionand check if you receive any output.
Installation of Tailwind CSS 4
Open your favored terminal and browse to your Blazor Application. To install Tailwind using pnpm, type the following command to your terminal:
pnpm install tailwindcss @tailwindcss/cliThis will install Tailwind CSS in it's latest version and additionally add the Tailwind CLI to your project.
Configuration for Blazor
If you already used Tailwind CSS before, you might remember the tailwind.config.js. This is not needed anymore in Tailwind CSS 4.0, but still supported for backward compatibility.
So all you need to do, is to import tailwind into a css file. To do so, create a wwwroot/tailwind.css file and add the following line to the file:
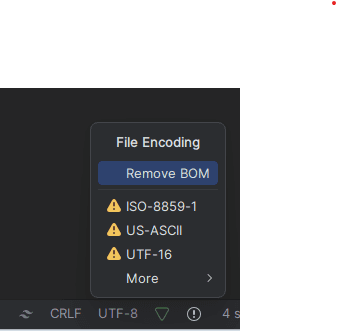
@import "tailwindcss";BOM (Byte Order Mark) is an encoding issue that can cause problems when interpreting files. Removing it ensures Tailwind CSS works correctly. Using Rider, you can make sure to remove BOM from the tailwind.css file as shown in the screenshot:

Generate and Serve CSS
Once your tailwind.css file is ready, it’s time to generate the CSS file that your application will use. Run the following command:
pnpm tailwindcss -i ./wwwroot/tailwind.css -o ./wwwroot/tw.cssThis will create a new tw.css file in your wwwroot folder. The -i flag specifies the input file, while the -o flag defines the output location.
To use the generated CSS file in your Blazor application:
- For Blazor Server: Add the following line to the
<head>ofComponents/Pages/App.razor:
<link rel="stylesheet" href="tw.css" />- For Blazor WebAssembly: Add the same line to
wwwroot/index.html.
Enhance Development Experience
Currently you have to run the tailwind css command by hand to regenerate your tw.css file and include newly used classes. To enhance this experience, you can add a new build target to your csproj file so the css is getting regenerated whenever you build the application.
<Target Name="TailwindCliBuild" BeforeTargets="Compile">
    <Exec Command="npx tailwindcss -i ./Styles/tailwind.css -o ./wwwroot/styles.css" />
</Target>
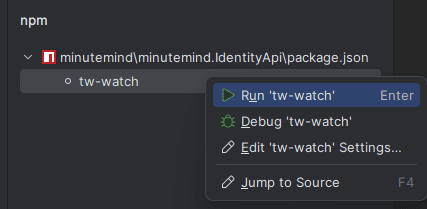
To be fair, this is only partly improving the experience. A better solution might be using a Npm Task Runner, which is luckily included in Rider. Open up your packages.json and add the following lines the file:
	"scripts": {
		"tw-watch": "pnpm tailwindcss -i ./wwwroot/tailwind.css -o ./wwwroot/tw.css --watch"
	},
Run the tw-watch task using your task-runner. Whenever you save a file now, the Tailwind CLI will automatically add the used classes to the styles.css and rebuild it.

Wrapping up
By following this guide, you’ve successfully modernized your Blazor application by integrating Tailwind CSS 4.0 and replacing the default Bootstrap styling. With its utility-first approach, Tailwind CSS offers unmatched flexibility and customization, empowering you to create responsive and visually appealing designs with minimal effort.
You’ve not only learned how to set up and configure Tailwind CSS but also explored ways to enhance your development experience with automated build processes and task runners. These improvements will save you time and ensure a smoother workflow as you build out your project.
Next-Steps
Now that you have Tailwind CSS fully integrated, here are some ideas for what you can do next:
- Experiment with Components: Explore Tailwind’s utility classes to quickly build custom components like buttons, cards, or navigation bars.
- Dark Mode & Themes: Add dynamic theming and dark mode support using Tailwind’s built-in features.
- Optimize for Production: Ensure your CSS output is minified and optimized for production by adding
--minifyto your Tailwind build commands by adding a new build target that runs for production builds.